Physics
🚧 This page is work in progress.
In your 3D world, you may want to simulate physical behavior and physical interactions between objects. Let’s see how to set up these kinds of physical simulations.
We will cover the different kinds of physics bodies you can make: static body, rigid body and kinematic rigid body. There is also a special kind of physics body called a character controller, which you should use for your playable, human-like characters. These all have different behaviour during simulation and when they collide with one another.
3dverse’s built-in 3D physics engine is an integration of the Nvidia PhysX engine. This is the same that Unity uses, so if you have any familiarity with Unity physics then your knowledge will transfer to 3dverse as well.
The physics implemented by the PhysX engine is not physically accurate, but consists of optimized approximations of the kinetics and kinematics of the real world. It aims to give the appearance of a world bound by the laws of physics.
Collision
In a game, when a player makes their character walk into a wall, the character doesn’t actually walk through the wall but stops at it. You can think of the sequence of actions as so:
- player input is relayed when player moves joystick in direction of the wall
- character’s position changes so that character and wall overlap
- collision is detected
- collision is resolved by moving the character back enough so that it doesn’t overlap with the wall
Collision detection is the detection of two physics bodies overlapping, or colliding. Collision resolution is the way that this detection is resolved. Depending on the bodies involved in the collision, collision resolution can be different. For example, a character controller uses a different collision resolution algorithm than a rigid body.
Simulation
Simulation is a state of the engine during which the physics engine is running. During simulation, your physics bodies will interact with each other according to the way you configured them. Their transforms could change. When you stop simulation their original transforms will be restored.

To start, pause and stop the simulation you can press Play, Pause and Stop buttons in the canvas toolbar.
Physics body
The physics bodies you can create are:
Each of these physics bodies require you to attach some kind of geometry to them which will define their geometry in the physics engine. In fact, the physics engine only “sees” these geometries, and will detect collision of your physics bodies by checking for overlap between these geometries.
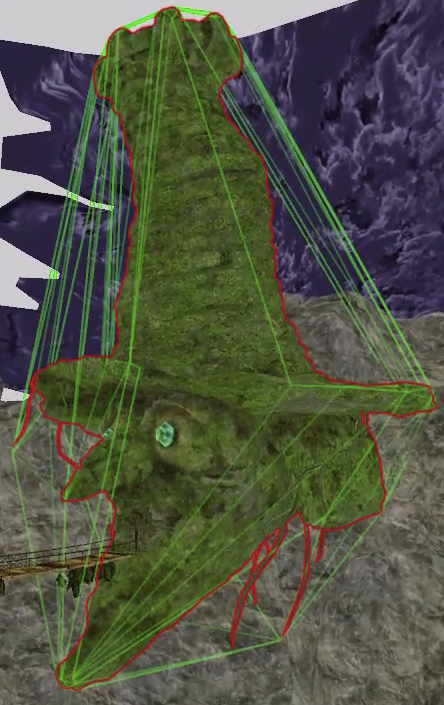
Enable debug lines to see your physics bodies
To see what the physics engine sees, enable debug lines. This will allow you to verify if your physics bodies have been well set up. If you can see the green lines of your geometry, that means your entity has been well registered inside the physics engine.

To enable debug lines, toggle the “enable debug lines” icon in the canvas toolbar.
If you see green lines around the entities you configured as physics bodies, you’re good to go. Otherwise check if you have a missing component.
![[object Object]](/images/docs/28d65446-8458-4e50-896e-94f517b6fd8f/Untitled-2aa6edc9-f0dd-4d1a-86ab-eb7932273405.png)
![[object Object]](/images/docs/28d65446-8458-4e50-896e-94f517b6fd8f/Untitled-531b70b8-59e4-4489-af6d-b6eec9297b8a.png)
Physics body geometries
The geometry of your physics body can be a box, a plane, a sphere, or a capsule. It can also be a convex mesh or a triangular mesh.
There are the components which correspond to each of these:
box geometry- dimensions: length, height, width of your box (in local space)
- offset: offset of box (in local space). This is useful if you need to offset the box’s position relative to your mesh. Origin is center of box
plane geometry- normal: plane normal
- distance: distance from world space origin
Planes divide space into "above" and "below" them. Everything "below" the plane will collide with it.
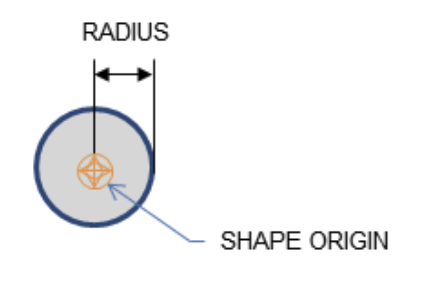
sphere geometry- radius
- offset: offset of sphere (in local space). Origin is center
capsule geometry- axis: 0 for X, 1 for Y, 2 for Z
- This is the axis that the capsule is aligned against. The capsule to the right has an X axis (i.e. axis = 0)
- height: see right
- radius: see right
- offset: offset of capsule (in local space). Origin is center
- axis: 0 for X, 1 for Y, 2 for Z
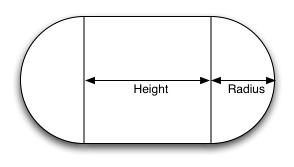
capsule
collision geometry reference- has a reference to a collision geometry asset (which takes the form of a convex or triangular mesh), see below.
*local space: local space of your entity with the geometry component, not affected by scale
🚨To make sure the attributes of these geometries are well set up (i.e. offset, dimensions, etc.), enable debug lines.
Collision geometry
If you want to use a triangular mesh or a convex mesh as a geometry for your physics body, you need to create a collision geometry. A collision geometry is an asset that you can create from a mesh you provide it.
There are two types of collision geometry:
- convex
- this is a convex mesh, that will encapsulate all the points of your mesh. A mesh is convex if, given any two points within it, the mesh contains the line between them.
- works with: static body, rigid body, kinematic rigid body
- triangular
- this is a triangular mesh, that will encapsulate all the points of your mesh. It will wrap as closely to the original mesh you provide as possible.
- works with: static body, kinematic rigid body
![[object Object]](/images/docs/f8aaae4f-5216-4c67-ace7-2923c02fd147/Untitled-b9b1dc86-9197-4037-ad52-7852c37be0b2.png)
🚨 Between the two, the convex collision geometry is the recommended default choice. A convex collision geometry is less computationally heavy as it contains less vertices than the triangular collision geometry. Also, triangular collision geometries cannot be assigned to rigid bodies.
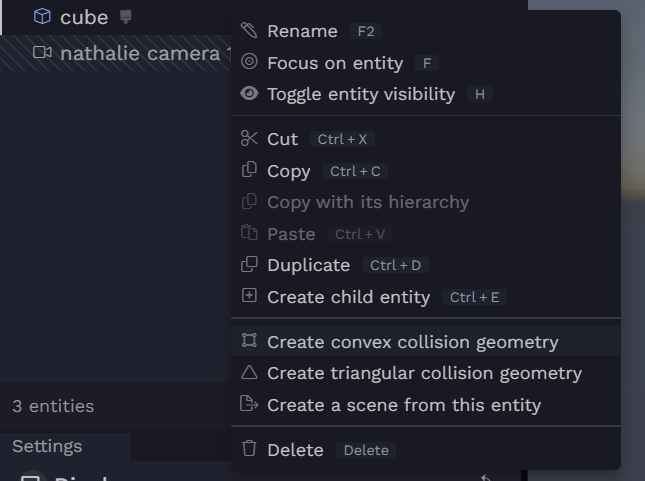
To create a collision geometry, right click on an entity with a mesh reference component in your scene graph and select “Create convex collision geometry” or “Create triangular collision geometry”.
Once the collision geometry is created, your entity will be automatically assigned a collision geometry reference component and the collision geometry will be attached to it.
Static body
When to use a static body?
For an entity that will not move during simulation such as a wall, the ground, or a building.
A static body will not be affected by forces such as gravity.
To make your entity a static body it needs the following components:
physics material- one geometry component from this list:
box geometry,capsule geometry,sphere geometry,plane geometryorcollision geometry reference
Rigid body
When to use a rigid body?
For an entity that that you want to be affected by forces such as gravity. Collision resolution of rigid bodies is made to seem very “physically accurate”.
A rigid body will collide against all other physics bodies.
To make your entity a rigid body it needs the following components:
physics material- one geometry component from this list:
box geometry,capsule geometry,sphere geometry, orcollision geometry reference(but the collision geometry must be convex, NOT triangular) rigid body(with isKinematic = false)
Fun fact: in real-world physics, a rigid body is any physical body that does not deform or change shape under physics forces. The distance between any two given points of a rigid body remains constant in time, regardless of external forces exerted on it.
Kinematic rigid body
When to use a kinematic rigid body?
For an entity that you want to move manually during simulation (e.g. by affecting its transform), such as a rotating door. A kinematic rigid body will not be affected by any forces such as gravity.
If you move a kinematic rigid body it will collide against rigid bodies, but not against static or kinematic rigid bodies (i.e. if you move it into a static body or another kinematic rigid body, it will go through, but if you move it into a rigid body, this will move your rigid body).
To make your entity a kinematic rigid body it needs the following components:
physics material- one geometry component from this list:
box geometry,capsule geometry,sphere geometry,plane geometryorcollision geometry reference rigid body(with isKinematic = true)
Character controller
When to use a character controller?
Use a character controller for an entity that you can consider kinematic (i.e. controlled by user inputs, not affected by forces like gravity), but is also your main playable character. A character controller will benefit from continuous collision detection and its own collision resolution algorithm that has been tweaked to provide a good feeling while controlling the player. More info here.
To make your entity a character controller it needs the following components:
character controller- one geometry component from this list:
box geometry,capsule geometry
🚨 Between the two, the capsule geometry is the recommended default choice.
<u>How to move a character controller:</u>
The character controller is moved by affecting its displacement in the character controller component. The physics engine will try to move the character controller by the displacement, and do any collision resolution if necessary. The displacement you input will be used to move the character only for that frame; you need to keep updating the displacement each frame you want to keep moving it.
<u>Note on orientation of character controllers:</u>
There’s a slight caveat with the box character controller. Unlike other bodies, the box geometry of a character controller will NOT be affected by the orientation of your entity. The box always has a fixed rotation even when the player is (visually) rotating.
However, the capsule character controller will be impacted by the orientation of your entity. The orientation of your entity will be multiplied to the axis vector of your capsule, which will decide the capsule’s orientation.
Trigger
When to use a trigger?
Make your physics body a trigger if you want to be notified of and react to collisions in your application code that involve that trigger body. Trigger bodies do not have any collision resolution though, they are simply collision “sensors”.
To make your entity a trigger it needs to be a valid physics body and have the following components:
physics materialwith isTrigger=true
Any physics body (except for character controller which doesn’t have a physics material) can be a trigger if you set isTrigger to true.
Trigger bodies are used for triggering events, and whatever collision that may occur with them is detected, but not resolved by the physics engine. Triggers are very useful in games! A trigger event will allow your application code to react to two entities colliding and apply some logic to that.
Physics events
Certain events of interest can be listened to in the code of your application. We will cover the details of how to do this later on.
The two events that can be listened to are the “enter trigger” event and the “exit trigger ” event. The “enter trigger” event is sent when a trigger body enters another body (or vice versa). The “exit trigger” event is sent when a trigger body exits another body (or vice versa).
The table below shows the result of collision between different kinds of physics bodies, i.e. whether the two trigger events are sent or not.
| Static | Rigid body | Kinematic | Character Controller | Static Trigger | Rigid body Trigger | Kinematic Trigger | |
|---|---|---|---|---|---|---|---|
| Static | - | - | - | - | - | trigger | trigger |
| Rigid body | - | - | - | - | trigger | trigger | trigger |
| Kinematic | - | - | - | - | trigger | trigger | trigger |
| Character Controller | - | - | - | - | trigger | trigger | trigger |
| Static Trigger | - | trigger | trigger | trigger | - | - | - |
| Rigid body Trigger | trigger | trigger | trigger | trigger | - | - | - |
| Kinematic Trigger | trigger | trigger | trigger | trigger | - | - | - |
trigger: “enter trigger” and “exit trigger” events are sent
More info
The recommendations of “when to use” each physics body are best practices. For example, a static body is recommended for a non-moving entity. Although you probably shouldn’t, don’t be surprised if you can actually move a static body during simulation by changing its transform. However, collision detection may not work as well and you may get unexpected results because of the way the physics engine is optimized. So it’s important to configure your physics bodies correctly and follow the recommendations outlined in this doc.