Canvas
Displays the video stream coming from the rendering server.
Provides direct interaction with the 3D scene using input devices, e.g. mouse and keyboard.
Toggles visual effects.
Composites the rendered frame with WebGL.
Composites 3D DOM elements over the final output.
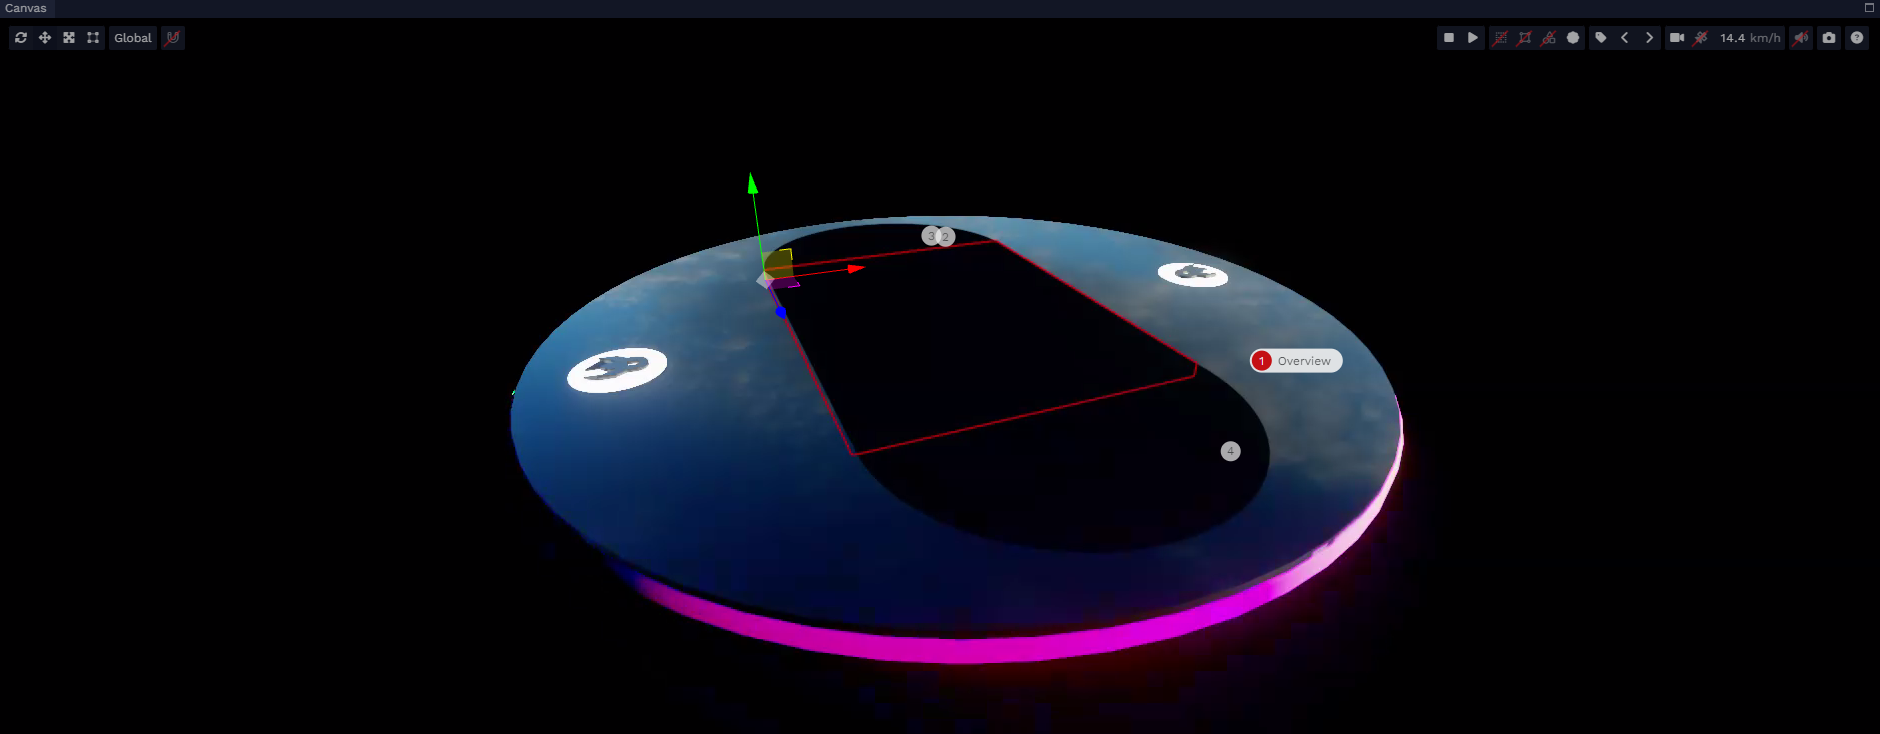
The canvas can be split in 3 zones, the canvas itself, the gizmo toolbar on the top left, and the display toolbar on the top right.
Rendering Canvas
The canvas uses 3 sources of rendering to display the final image.
- The video stream coming from the remote renderer
- The WebGL viewport rendered locally on the client’s device
- The DOM overlay rendered by the browser.
Navigation

| Action | Shortcut (QWERTY) |
|---|---|
| Move Forward / Backward | W / S |
| Move Left / Right | A / D |
| Move Up / Down | E / Q |
| Look around | Hold RMB + Move Mouse |
| Selection | LMB |
Advanced shortcuts:
| Action | Shortcut |
|---|---|
| Move Forward / Backward | Mouse Wheel |
| Move Forward / Backward | Hold LMB + Move Mouse Up/Down |
| Move Left / Right / Up / Down | Hold MMB + Move Mouse |
| Change Speed | Hold LMB or RMB + Mouse Wheel |
LMB = Left Mouse Button
MMB = Middle Mouse Button
RMB = Right Mouse Button
Gizmo toolbar

The gizmo toolbar offers multiple ways to interact with the 3D scene using gizmos.
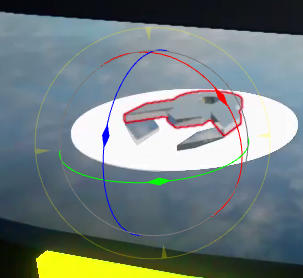
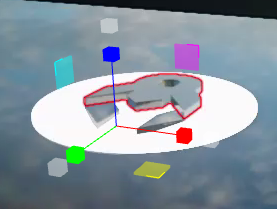
Gizmos use the following color code when appropriate:
| Color | Axis/Plane |
|---|---|
| Red | X axis |
| Green | Y axis |
| Blue | Z axis |
| Yellow | XY plane |
| Cyan | YZ plane |
| Magenta | XZ plane |
| White | XYZ space |
Rotate
Shortcut: R
Each circle rotates the selected entity (or entities) around the corresponding axis.
The yellow circle allows you to rotate the entity relative to the current view position.
Translate
Shortcut: T
Clicking and dragging on an axis will lock the translation to that axis.
The small colored squares at the base of the arrows allow translation on the given plane.
The small white diamond at the base of the arrows allows unconstrained translation in 3d space.
![]()
Maintaining CTRL pressed while dragging on an axis of the translation gizmo will duplicate the currently selected
entity or entities.
Once duplicated the new entity will remain even if the CTRL key is released.
Scale
Shortcut: Y
Clicking and dragging on an axis will constrain scaling to that axis.
The small colored squares in the corners allow scaling on the given plane.
The white cubes at the end of each axis all have the same effect of homogenous scaling, i.e. apply the same scale value for all axes.
Rect Tool
Shortcut: U
The Rect Tool allows you to apply a scale and translation to an entity with the same gizmo.
It appears as a blue rectangle with white handles in the corners.
Depending on the viewing angle it will adapt itself to display the largest apparent face of the underlying bounding box of the selected entity.
Dragging the corner handles will affect the position and scale of the selected entity.
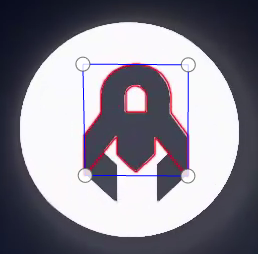
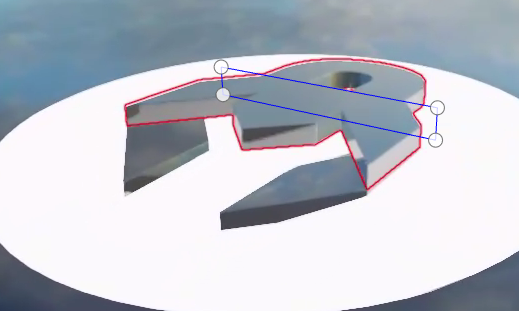
Beware of negative scaling which can affect the rendering result.
Global / Local
Shortcut: X
Affects the space in which the gizmos operate, toggling between global space and local space.
It will also affect the display of the transform component.
Grid Snapping

Toggling snapping on will make all gizmos work in increment.
The increment can be specified per transform type.
Units can be specified as well.
Changing the units won’t affect the way the grid is rendered.
The grid uses meter-based units, with the smallest section being 0.1m or 10 cm.
Display toolbar

Simulation

Stop simulation F8
Stops the scripts and physics simulation.
Play/Pause simulation F7
Starts/Pauses the scripts and physics simulation.
Overlay

Toggle grid display G
Interacts with the render graph, works only if the render graph has support for displaying a grid
Toggle debug lines display
Debug lines need to be enabled in the scene settings
Toggle geometry display
Deprecated
Toggle sprite display Sprites are used to show entities that don’t have a visual presence like lights or sounds.
Toggle label display
Displayed only if the scene contains at least one label.
A label is a point of interest in the scene that saves a particular camera transform that can be reapplied later on.
Camera

Label navigation
Displayed only if the scene contains labels.
Moves the camera from label to label.
The order of the labels is arbitrary.
Camera settings
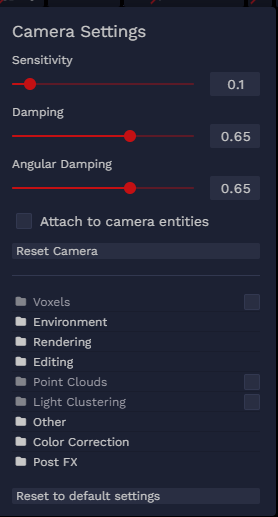
Sensitivity: a factor to how much effort it takes to move and rotate the camera with the mouse. The higher the number, the less effort it takes to rotate the camera.
Damping: how fast the energy depletes after releasing movement input. The smaller the number, the less residual energy is generated.
Angular Damping: same as Damping but for rotation.
Attach to camera entities: toggle to see other cameras in full viewport.
Reset Camera: resets the camera settings to their default values as well as the camera position
Reset to default settings: resets the render graph values to their default settings as defined in the scene settings or the render graph.
The middle section (Voxels, Environment, …) is data driven and will depend on which render graph is attached to the current camera.
Toggle orbit controller
Change the controller to an orbital one and back to the default one.
Camera settings apply to the orbital controller as well.
Change camera speed
Adjust the camera speed in km/h.
Toggle sound
Mutes/unmutes the sound on the engine side.
Take a snapshot
Take a screenshot from the current camera point of view and overwrite the thumbnail associated with the current scene.
It will also overwrite the default camera settings and transform in the scene settings.
Display navigation help
Context menu
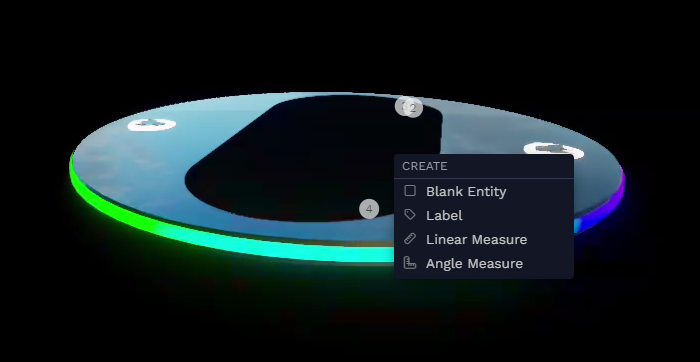
Right-clicking on the canvas will open the context menu.
It allows you to create blank entities, labels or take linear or angular measures.
The entities will be created right under the mouse pointer.
If the pointer is on top of a surface the position will be on top of that surface otherwise it will use the ground plane (Y=0) to position the entity.
Measures must start and end on a surface, so clicking on the void won’t generate any measure.
Collaboration
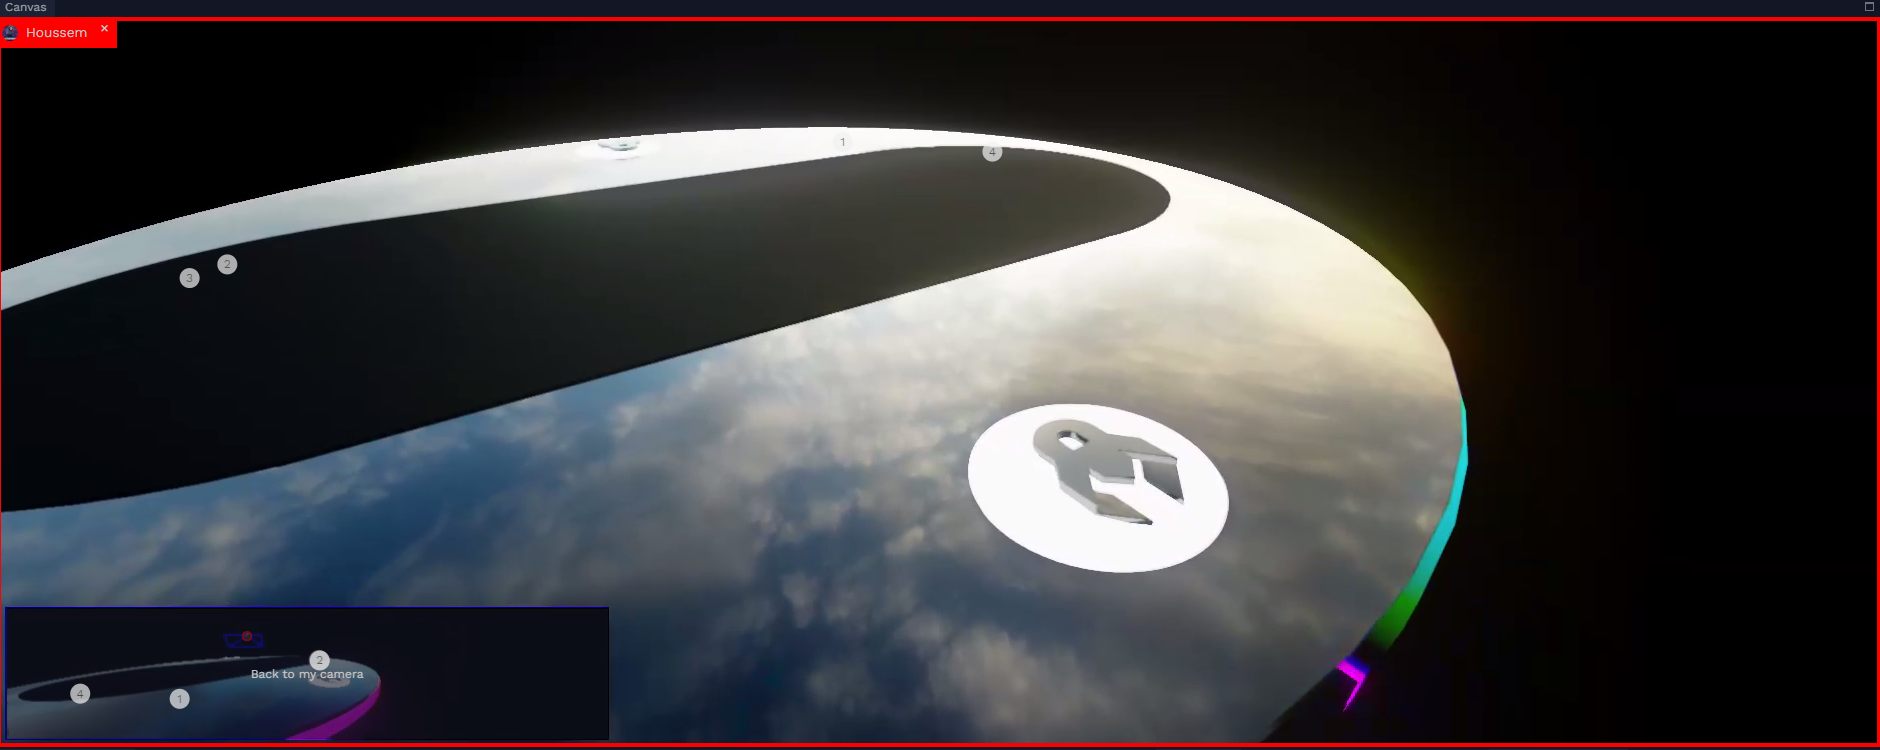
When multiple users are in the same session their avatar will be displayed as a 3D DOM element on top of the canvas. Clicking on the avatar teleports your own camera to the same position and orientation as the targeted user.
When watching is enabled a small viewport will appear on the bottom of the canvas that displays the other user’s point of view in real-time.
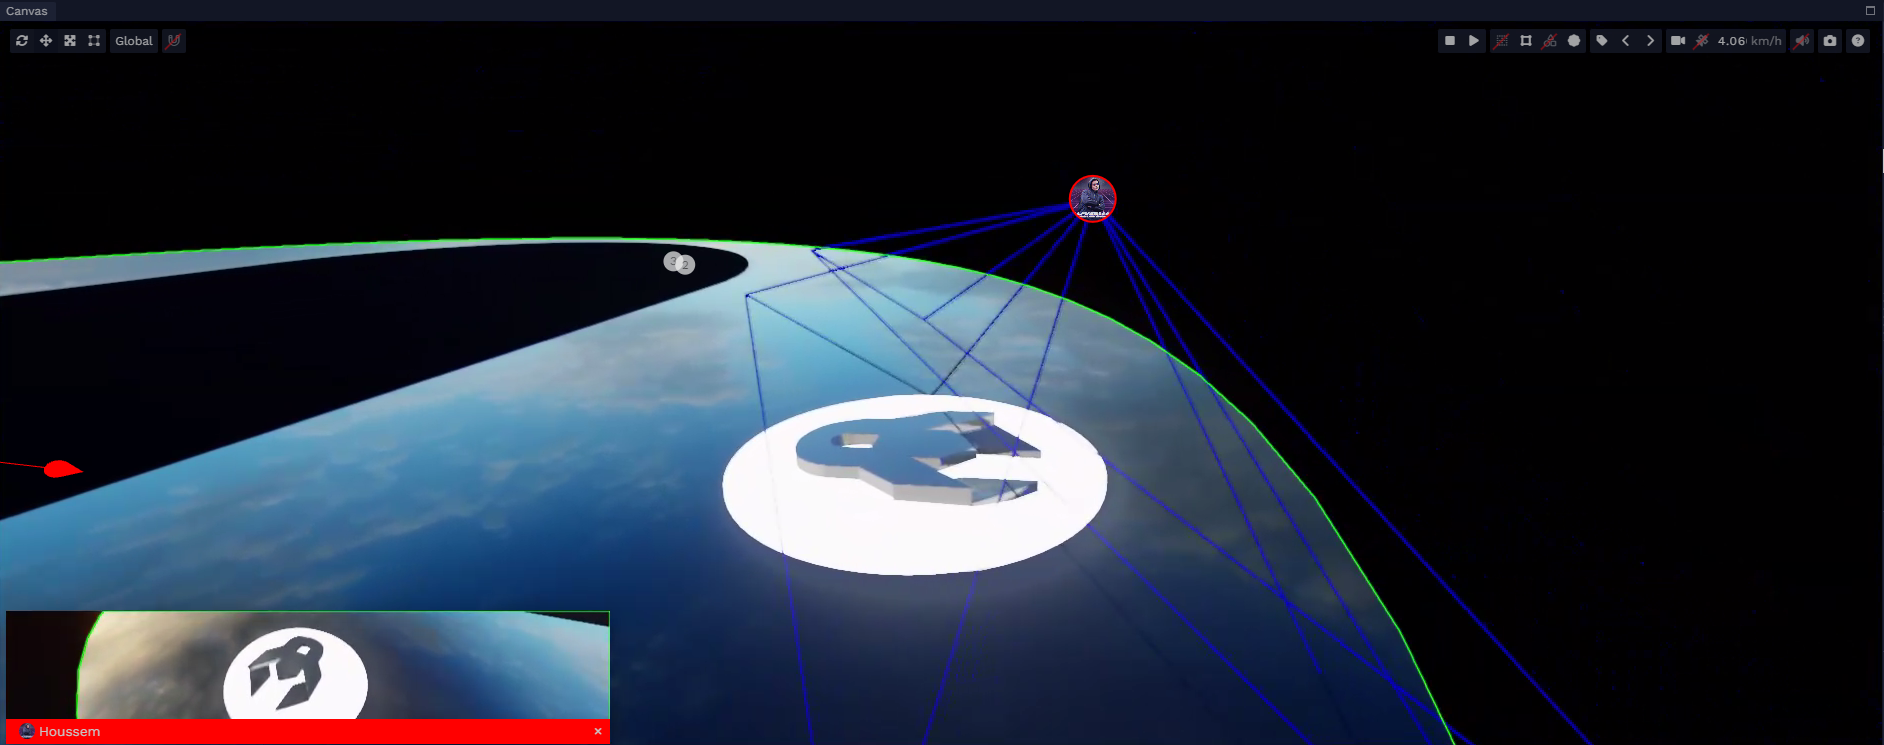
Clicking on it will swap your view with the watched user’s view.
The swap will be highlighted with a border around the canvas having the same color as the watched user’s avatar.
To go back to your camera you can either close the view or click on Back to my camera to swap back the views.
Note that you can watch multiple users at the same time, multiple views will stack on the bottom of the canvas.
Related resources

Editor Camera Controls
How to control the camera in the Editor.