Building a Livelink.js Client from Scratch
This guide demonstrates how to build a complete 3D application using Livelink.js, the TypeScript library that manages the connection between your browser and 3dverse's cloud renderer.
Before You Start
Most applications built with 3dverse use Livelink.React — a higher-level integration of the Livelink SDK tailored for React-based frontends.
Livelink.React wraps Livelink.js with:
- React hooks and lifecycle bindings
- Automatic surface and input management
- Built-in session handling
If you're building a production app with React, we recommend starting there.
This guide focuses on Livelink.js, the lower-level API that powers all 3dverse clients. You don't need to use it directly unless you're building a custom integration, using vanilla JavaScript, or want to understand how the system works under the hood.
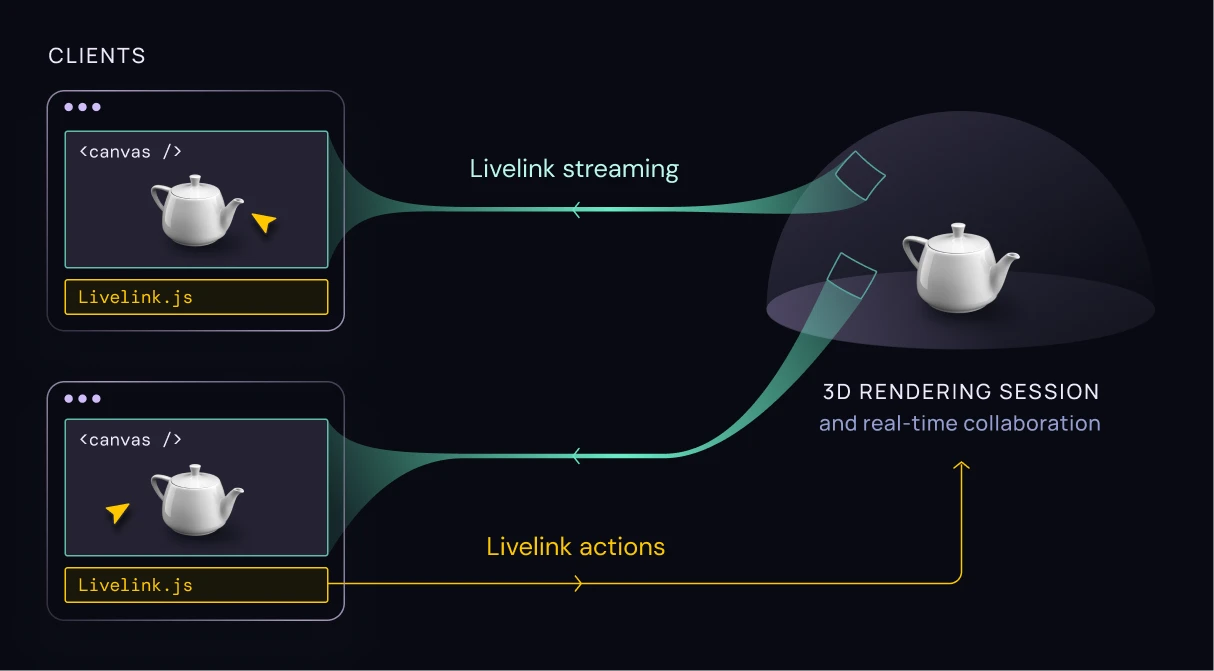
Understanding Livelink Architecture
Before diving into code, it's critical to understand how Livelink.js integrates into the 3dverse platform.
3dverse's Cloud-Native Architecture
3dverse follows a three-tier architecture designed for real-time, cloud-native 3D rendering:
- Client Tier – Your browser-based app, responsible for rendering the video stream and sending input events and commands.
- Platform Tier – The 3dverse cloud platform that handles project management, authentication, and asset access. Communication with this tier happens over the Asset API.
- Renderer Tier – A cloud-hosted renderer that executes the scene in real time and streams frames back to the client.
Communication with this tier uses a custom binary protocol over WebSocket, managed by
Livelink.js.
The Role of Livelink.js
Livelink.js is the client-side library that connects your application to the 3dverse cloud renderer.
It is primarily used in the browser to display streamed frames and handle user input. It can also run in headless mode on a server (Node.js), enabling use cases like simulation, automated testing, or backend-driven scene manipulation.
In both environments, Livelink.js is responsible for:
- Establishing a session with the platform (authentication, scene lookup)
- Managing the rendering surface and video decoding pipeline
- Capturing and routing user input (mouse, keyboard, touch, gamepad)
- Modifying the scene graph in real time by creating, updating, or removing entities and components
- Receiving and displaying the rendered frame stream
Internally, it consists of two layers:
-
Livelink.js— the public TypeScript wrapper. It handles:- Canvas and rendering surface setup
- WebCodecs decoding
- Input event propagation
- Scene and entity API access
-
Livelink.core— a dynamically loaded module that implements:- The low-level Livelink protocol (binary serialization, diff-based replication)
- Entity-component networking and scene state sync
- WebSocket communication with the renderer backend
Real-Time Collaboration
Livelink also enables real-time multi-user collaboration.
When multiple clients connect to the same session, any scene change—such as transforming an entity or modifying a component—is automatically:
- Serialized through
livelink.core - Broadcast to all connected clients
- Applied locally for synchronized state across the session
This built-in replication system eliminates the need for custom networking code. Shared editing is native to the platform.
Building a Minimal Livelink Client
The rest of this guide walks through a complete example using vanilla JavaScript. You'll learn how to initialize a session, display streamed frames, and set up a controllable camera in the browser.
To follow along, create a basic .html file on your machine, copy in the code as we go, and open it in a Chromium-based browser like Chrome or Edge. This is the quickest way to try Livelink using a direct import from unpkg, with no need for build tools or servers.
For real projects, we recommend installing the SDK via npm and using it in a Node.js 18+ environment, or within a framework like React or Vite.
1. Creating the Canvas
Start by creating a basic HTML page with a canvas element. This canvas will be used by Livelink to display the rendered frames streamed from the cloud.
Save the following snippet as a .html file and open it directly in a Chromium-based browser (like Chrome or Edge):
<html>
  <body style="margin: 0; padding: 0">
    <div class="canvas-container" style="width: 100vw; height: 100vh;">
      <canvas
        id="display-canvas"
        tabindex="1"
        oncontextmenu="event.preventDefault()"
        style="width: 100%; height: 100%;"
      ></canvas>
    </div>
  </body>
</html>
What This Does
- Canvas ID: The
idlets you reference the canvas in JavaScript. - Fullscreen Layout: The canvas fills the entire viewport using inline styles.
- Keyboard Focus:
tabindex="1"ensures the canvas can receive keyboard input. - Right-Click Suppression: Disabling the context menu improves the UX for 3D interaction.
2. Importing Livelink.js
Livelink.js can be imported directly from a CDN using ES6 module syntax. This is the simplest way to try it without setting up a build step or local server.
Add the following block just before the closing body tag of your HTML file:
<script type="module">
    import {
        Livelink,
        RenderingSurface,
        Viewport,
        WebCodecsDecoder,
        CameraProjection,
        CameraController,
    } from "https://unpkg.com/@3dverse/livelink/dist/index.mjs";
</script>
This will give you access to all the core classes needed for initializing the session, configuring the renderer, and setting up a camera.
What These Classes Do
Livelink– Creates and manages the cloud session.RenderingSurface– Sets up the canvas and manages drawing.Viewport– Defines where and how content appears in the canvas.WebCodecsDecoder– Decodes the video stream from the renderer.CameraProjection– Connects a camera entity to a viewport.CameraController– Adds camera controls in the browser. By default, it uses an orbit-style controller, but it's highly customizable to support different navigation models.
3. Establishing the Cloud Connection
To begin streaming a 3D scene, you first need to verify browser compatibility and create a session with the 3dverse platform.
Step 1: Check Browser Support
Livelink relies on the WebCodecs API to decode video frames streamed from the renderer. Before creating a session, make sure the current browser supports a compatible codec:
const codec = await WebCodecsDecoder.findSupportedCodec();
if (!codec) {
    throw new Error("WebCodecs not supported in this browser.");
}
Most modern Chromium-based browsers (like Chrome and Edge) support this API.
Step 2: Create a Session
Once a codec is confirmed, establish a session by calling Livelink.start() with your credentials:
const instance = await Livelink.start({
    scene_id: "322c6bf7-52eb-4197-ab42-a0924f71d72d",
    token: "public_UjENe9mA-wgTBYvw",
    is_transient: true,
});
This method initializes your connection to the platform and fetches the latest version of livelink.core — the runtime module responsible for low-level communication and replication. It's dynamically loaded from a CDN, ensuring your app stays forward-compatible with evolving engine versions.
Session Parameters
scene_id– The UUID of the 3D scene to load.token– An access token associated with your project.is_transient– When true, no changes will persist after the session ends.
4. Configuring the Streaming Pipeline
With a session established, the next step is to set up the rendering pipeline and video decoder. This is what connects the remote renderer to your canvas element in the browser.
Step 1: Create the Rendering Surface and Viewport
The canvas element in your HTML page is wrapped by a RenderingSurface, which provides the low-level interface to draw frames. A Viewport defines the portion of the surface where the 3D scene will appear.
const canvas_element = document.getElementById("display-canvas");

const rendering_surface = new RenderingSurface({
    canvas_element,
    context_type: "2d",
});

const viewport = new Viewport({
    core: instance,
    rendering_surface,
    options: { dom_element: canvas_element },
});

instance.addViewports({ viewports: [viewport] });
What's happening here:
RenderingSurfaceabstracts the canvas contextViewportdefines how and where the stream is displayedaddViewports()connects the viewport to the session
Step 2: Configure the Video Decoder
Livelink streams encoded video frames from the renderer backend. You'll now configure the decoder to handle them.
Start by telling the server which codec your browser supports:
await instance.configureRemoteServer({ codec });
Then, set up the decoding pipeline using WebCodecs:
await instance.setEncodedFrameConsumer({
    encoded_frame_consumer: new WebCodecsDecoder({
        decoded_frame_consumer: instance.default_decoded_frame_consumer,
    }),
});
This sets up the video pipeline to receive encoded frames, decode them using the browser's WebCodecs implementation, and draw them to the canvas.
5. Setting Up the 3D Camera
To visualize the scene from a specific point of view, you need to create a camera entity and link it to your viewport. Livelink gives you full control over the camera setup, including projection parameters, transform, and user interaction.
Step 1: Create a Camera Entity
A camera in 3dverse is just another entity with a few specific components:
const DEFAULT_RENDER_GRAPH_UUID = "398ee642-030a-45e7-95df-7147f6c43392";
const RENDER_GRAPH_SETTINGS = { grid: true, skybox: true, gradient: false };

const camera_entity = await instance.scene.newEntity({
    name: "MyCamera",
    components: {
        local_transform: { position: [0, 1, 5] }, // Camera position in world space
        camera: {
            renderGraphRef: DEFAULT_RENDER_GRAPH_UUID,
            dataJSON: RENDER_GRAPH_SETTINGS,
        },
        perspective_lens: {}, // Uses default FOV and aspect ratio
    },
    options: { auto_broadcast: false },
});
Component breakdown:
- Transform
- Defines the camera's position and orientation in world space
- Camera
- Sets render graph and visual configuration (e.g. skybox, grid)
- Perspective Lens
- Chooses projection type and parameters (optional overrides available)
Step 2: Bind the Camera to the Viewport
To display the view from the camera, connect it to the viewport using a CameraProjection. This tells the renderer which entity to render from.
viewport.camera_projection = new CameraProjection({ camera_entity, viewport });
You can change the projection at runtime to switch views or support multiple perspectives.
Step 3: Enable Camera Interaction
Use CameraController to make the camera interactive. It provides orbit-style controls by default.
const controller = new CameraController({ camera_entity, viewport });
6. Start the Stream
With the session established, viewport and camera configured, and decoding pipeline set up, you can now start receiving and displaying frames from the cloud renderer.
Begin Real-time Rendering
Call startStreaming() to begin receiving video frames from the cloud:
instance.startStreaming();
This starts the streaming loop, which:
- Receives encoded video frames from the renderer
- Decodes and displays them on the canvas
- Sends input and camera updates back to the cloud in real time
- Synchronizes scene updates between clients and server
Once this call completes, you should see your scene rendered inside the browser window.
7. Final Code Recap
This is the full example from the previous steps, ready to copy and run in any Chromium browser.
<html>
  <body style="margin: 0; padding: 0">
    <div class="canvas-container" style="width: 100vw; height: 100vh">
      <canvas
        id="display-canvas"
        tabindex="1"
        oncontextmenu="event.preventDefault()"
        style="width: 100%; height: 100%"
      ></canvas>
    </div>

    <script type="module">
      import {
          Livelink,
          RenderingSurface,
          Viewport,
          WebCodecsDecoder,
          CameraProjection,
          CameraController,
      } from "https://unpkg.com/@3dverse/livelink/dist/index.mjs";

      // Verify browser compatibility
      const codec = await WebCodecsDecoder.findSupportedCodec();
      if (!codec) {
          throw new Error("WebCodecs not supported in this browser.");
      }

      // Establish cloud renderer session
      const instance = await Livelink.start({
          // Replace with your scene ID and access token
          scene_id: "322c6bf7-52eb-4197-ab42-a0924f71d72d",
          token: "public_UjENe9mA-wgTBYvw",
          is_transient: true,
      });

      const canvas_element = document.getElementById("display-canvas");

      // Setup rendering pipeline
      const rendering_surface = new RenderingSurface({
          canvas_element: canvas_element,
          context_type: "2d",
      });

      const viewport = new Viewport({
          core: instance,
          rendering_surface,
          options: { dom_element: canvas_element },
      });
      instance.addViewports({ viewports: [viewport] });

      // Configure video decoding
      await instance.configureRemoteServer({ codec });
      await instance.setEncodedFrameConsumer({
          encoded_frame_consumer: new WebCodecsDecoder({
              decoded_frame_consumer: instance.default_decoded_frame_consumer,
          }),
      });

      // Create and setup camera
      const DEFAULT_RENDER_GRAPH_UUID = "398ee642-030a-45e7-95df-7147f6c43392";
      const RENDER_GRAPH_SETTINGS = { grid: true };
      const camera_entity = await instance.scene.newEntity({
          name: "MyCamera",
          components: {
              local_transform: { position: [0, 1, 5] },
              camera: {
                  renderGraphRef: DEFAULT_RENDER_GRAPH_UUID,
                  dataJSON: RENDER_GRAPH_SETTINGS,
              },
              perspective_lens: {},
          },
          options: { auto_broadcast: false },
      });

      // Link camera to viewport and enable controls
      viewport.camera_projection = new CameraProjection({
          camera_entity,
          viewport,
      });
      const controller = new CameraController({ camera_entity, viewport });

      // Start streaming real-time 3D frames
      instance.startStreaming();
    </script>
  </body>
</html>
Building a Headless Client
On any javascript runtime, like Node.js you can run an headless livelink client. The minimal code is simple as that:
import { Livelink } from "@3dverse/livelink";

function main() {
    const instance = await Livelink.start({
        // Replace with your scene ID and access token
        scene_id: "322c6bf7-52eb-4197-ab42-a0924f71d72d",
        token: "public_UjENe9mA-wgTBYvw",
        is_transient: true,
        is_headless: true,
    });

    await instance.startHeadlessClient();
}
main():
As soon as the headless client is started, it can interact with the 3dverse session as usual: update entities, send events, etc...
Try the Full Example
You can preview the full setup live in your browser.
Use your own scene
Replace the scene_id and token with values from your project. You can find them in the console.
Key Takeaways
- Cloud-first
All rendering is performed remotely. The browser simply displays the streamed video frames. - Protocol abstraction
Livelink.js manages session lifecycle, state sync, and communication with the renderer backend. - Seamless browser integration
Built on top of Web APIs like WebCodecs and WebSockets for optimal performance. - Entity-Component model
All scene data — including cameras — is structured as entities composed of components. - Real-time feedback
Input events are streamed to the cloud; updates appear in the video stream with minimal latency.
You now have everything you need to start building with Livelink.js and the 3dverse platform.